
Lesson 4
Moving through time
Where the playhead is, how to put it somewhere else, and what the four thin strips above your tracks are for. None of them holds any music, which is exactly why they are easy to ignore for months.
The readout, field by field
Six things, left to right, and every one of them answers a question you would otherwise have to open a window to ask.

A stopped transport at the start of an empty project. The chord shows a dash because nothing is playing.
- BAR is where the playhead is, as bar, beat and tick. This is the number you will read most.
- BPM and SIG are the tempo and the time signature, and both are editable in place.
- CHORD is what the harmonic engine is currently holding, which is a fact about the project rather than about any track. It is a dash when the transport is stopped.
- TIME is elapsed time in minutes and seconds, for the occasions when a piece has to be a certain length.
- The meter and load on the end are the master output level and how hard the audio engine is working. They are there because the two ways a session goes wrong quietly are clipping and running out of processing headroom, and neither used to be visible without opening something.
Two keys, and they do different things
Space plays and pauses, leaving the playhead where it stopped. Return stops and sends it back to the beginning. That distinction is worth having in your fingers early, because wanting one and pressing the other is a small, constant annoyance that takes a surprisingly long time to notice you are doing.
Space belongs to the transport and is taken back from anything that tries to claim it, so it keeps working wherever you are in the application, except while you are typing into a text field.
The four lanes
Above your tracks and under the ruler are four strips. They are easy to miss because a new project leaves all four empty, and empty they are four grey bands with labels on them.
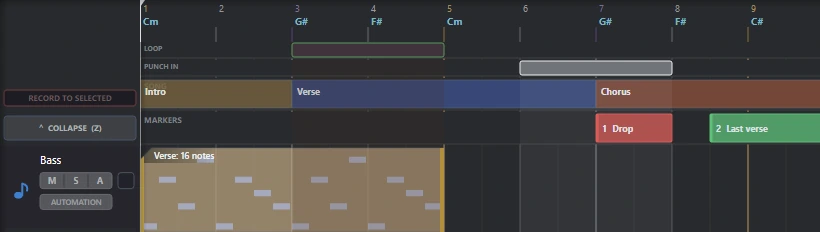
All four in use at once. The chord names sit in the ruler itself, under the bar numbers.
LOOP and PUNCH are braces, not regions
The top two strips look like the timeline below them and behave nothing like it. A loop brace holds no content. It is a bracket over a stretch of bars that says the transport does something here, and that is the whole of it.
LOOP makes playback come back round. Drag one out in the lane and the transport repeats those bars until you take it off again.
PUNCH IN is the recording equivalent: it decides where recording starts and stops, so you can play through a passage and only have the middle of it captured.
There is exactly one of each, and that is deliberate rather than a limitation. A second punch region would have to answer which one the record button means, and there is no good answer to that question.
By default a punch stops at the end of its range. There is an option to keep going round and record a fresh take each time instead, and it is off until asked for, because a transport that loops during a take is the surprising behaviour rather than the expected one.
SONG and MARKERS both name stretches of time
The lower two lanes hold things you make rather than braces you drag.
SONG holds sections, and a section is one of six named types: verse, chorus, bridge, intro, outro and break. Each has its own colour, so the shape of an arrangement is readable from the strip alone without reading a word of it.
MARKERS holds named spans of your own. Two things about them are not obvious from the word. First, a marker has a start and an end: it is a stretch of time rather than a point in it. Second, the first nine are numbered, and Ctrl plus that number sends the playhead to the marker. You can see the digits on them in the figure above.
That shortcut is checked before the space bar, specifically so that nothing else bound to a number can swallow it.
Two different things are called zoom
This is the one genuine trap in the lesson, and it is a naming problem rather than a design one.
The plus and minus buttons in the top bar are the horizontal zoom. They multiply and divide how many pixels a beat gets by 1.3 a click, so they change how many bars fit on screen. That is a continuous control and you can land anywhere on it.
Z is the vertical one, and it is not a continuous control at all. It is a switch between two track heights, and the taller of them is what makes room for the mute, solo and arm buttons and the automation row in each track header. If those disappear, you have pressed Z.
Different axes, different kinds of control, one word. The tooltips in the application try to warn you and this lesson is the longer version of the same warning.